This posting is meant to be a detailed answer to a question posted on the StarshipModeler Forum on how to generate cross section bulkheads from plan drawings, presumably orthogonal views with detail cross section lines. While the forum post was for plastic models, and this process is generally for paper, the process is transferable to plastic card scratch building.
To create an example I looked for a publicly available set of plans that show cross section lines. An adequate one was found for a prototypical design for an 19th century
Arctic exploration vessel of the US Navy at www.history.navy.mil which was associated with the ill fated
Jeanette Arctic Expedition, although it appears to not represent the
Jeanette itself.
The software used was
Blender 2.5x, which is admittedly old, but I'll try to keep the description general so it would be applicable to any 3d modeling software. The features that are used most often are:
- insertion of primitive objects,
- selecting faces, lines, or vertices
- creation of lines and faces from selected vertices or lines
- scaling, both objects and selected vertices, particularly along a single axis (such as scale in X direction only)
- Merging vertices and extrusion of vertices, lines and faces from existing ones, particularly along a single axis.
- View frames set to either top/bottom, left/right, front/back
Step1: Get the Views in the right place:
I took the original sketch (and it is really just a sketch) and generated a good set of orthogonal views by correcting the slight tilt in the original and creating a reasonably clear front and stern elevation. This was done with "gimp"(
GNU image manipulation program), but any image manipulation software, such as Photoshop, should be able to do this. The sketch had no top view, but that was ok as what we are really concerned here is the general hull shape from the top deck down. The file was saved as a png file. Again, the purpose of this exercise was to illustrate a process and not generate a real model, so this sketch is not super accurate. Of course on the other hand, I hardly ever work with views that have any sort of sectional lines at all, so this should be interesting.

This version of Blender allows one to add various types of images to the blender files as a "background image" property. Most 3d viewing systems allow this in some manner, shape or form. In Blender these may be visible only in particular orthogonal views. I've seen image captures of other systems that allow you to set it at the origin so that it is also visible in multiple angle views. (aside: Blender allows visibility of one image in all orthogonal views, but this is only practical if the object is symmetrical in all axis, like a sphere, or perhaps if some of the views will not be used such as the radial symmetry of a rocket body).
Blender allows you to center and scale the image to your liking in the viewport. If you are going to use separate views (top/left/front), it is important to pick a particular point of the plan to be at the origin (0,0,0) to maintain consistency. An annoying aspect to this in Blender is that the background image is not optically at the same point so to speak, meaning that even though you use a set of images that are scaled equally, when in the viewport, the actual scale set may not match. This was the case in this project. Often you will not be able to get the plan scaled correctly until you have defined the parameters of the 3d model, so you many initially only work from one view, then check and size the views accordingly.
In this case this happened to me. I initially set the origin at the bottom of frame 70 for left/right views - no problem. Then I set front and back, and it turned out ok for scale as well. I worked most of the process described next with just these views, but when I switched to "bottom" view, well the image was much too small, and to match the loft lines I had to scale it up a tad. Another annoying problem with Blender is that well, it's got it's axis screwed up in that it puts "front" in back and "back" in front (at least if I'm following a left hand rule), so I did have to remember to swap the views (It probably has to do with some drafting rule).
Step 2: Insert a primitive to sculpt
One can use any number of primitives to generate the basic shape of the hull, but the most logical thing is to use something that can easily approximate your target shape. In this case, a cylinder or a cube would probably be good. I picked a cube as it would allow me to start off with few edges and vertices and add as needed. It is also closer to the traditional method of hull building from a block of balsa.
The cube was placed and scaled to the sketch on one of the views. I am starting from the starboard view. The cube then needed to be stretched to the appropriate length. This can be done by selecting the forward and back face and move it along the y axis (in Blender, select face, g, y) until you get it to the desired length. Note, I didn't take it all the way to the end, this was done just to avoid several merge points as the ends of hulls tend to be pointy.
Step 3: Shaping the object
The hull is bilaterally symetrical, so I set up a new edge that would split the object down the middle.
|
| First I selected an edge that goes across the shape. Then I selected the "edge ring", namely the other "parallel" edges around the object. |
| Aside: In Blender this is a possible selection operation once an edge is selected. The word parallel is quoted because in truth it isn't parallel lines being selected but co-lateral segments. If this where a sphere, it would select the segments along a particular cross-section. Once shapes become more complicated the actual path of the ring might be less clearly defined and no longer ring like |
| With the edges selected, I can carry out a subdivide operation on them. These will neatly add a vertex to the exact middle of each line segment effectively spliting the rectangular prism into two equal halves. Each half represents the starboard and port half respectively |
| Select one of the vertical edges on the faces and select the ring. Carrying out a subdivision will then result in an equatorial line.
Select this equatorial line and lift up or down to match one of your draft lines in the side views |
|
| The quick way is to select one segment then select the "loop" of segments which selects the collinear segments to that line. In Blender, once selected you can use the "g"+"z" keys to command move selected along z axis. |
|
| Repeating the process selecting the lateral ring will generate all the horizontal sections in the plan |
|
| Each cross section may have to be moved in a similar way, by first selecting the cross-section loop and moving solely along the y axis in this case.
The block should now be sectioned to match the sketch. A couple of things I didn't do was stretch to cover the prow or the fantail. I'll do these two bits differently. |
| At this point I'm ready to pull the block closer to the shape I want. Starting at the front, there's a couple of options. One would be to extrude the prow. The other shown below is simply start pulling out the front center line to match. |
|
| I selected the top center vertex at the front and pulled it out to match the sketch (g+y). This generated some distorted faces so I subsequently subdivided some line segments and then cleaned up a bit by getting rid of edges (x in blender) then adding some new edges (f in blender). |
| I selected the next center point immediately below and pulled it out similarly. The special case here was selecting some edges to create a new cross section through subdivision, and then pulling the vertices to get everything to match. |
|
| An important feature of must 3D programs is the ability to get vertices to line up along an axis or slope. Since the alignmnets here were simple I simply made sure that the cartisian coordinates of co-axial points lined up. Also by setting up the centerline along the origin, mirrored points can be set up to be at the same but negative cartisian coordinates. |
|
Repeating the process of pulling the center points I eventually approximate the forward edge of the prow |
|
| Shaping the sides now requires selecting a pair of mirrored vertices along a co-linear axis (this case x) to match the drawing for that cross section (Blender select points then "s" "x")Repeating the process for the rest of the points, I eventually arrive at the rough shape of the prow.
Moving down the cross section starts to create the shape. |
|
| These points set up an unique, but not unusual situation, that is that all three should be merged together. In Blender I select these three points. Then alt-m selects "merge" which in this case was the last selected, this being the center point of the three. (Note: I didn't repeat this for the other sections instead I placed the ends .1" off the center-line...see detail bottom view) |
| More or less this way the forward hull is generated. The limit is in that to shape the rear you need to see the rear elevation. Note that while doing this I alternated between solid view (shown here) and wireframe which allows you to see the background image. This will make working with the rear trickier since in wireframe view the front will be seen and particularly when in non-perspective view, which vertex you are looking at can be confusing. Switching between solid and wireframe to check your selection will be important. |
| The fan tail was done slightly differently than the bow, in that instead I extruded that deck from the back frame. This was done by choosing the face that makes up the point adjacent to the fan tail. The "extrude" operation was chosen (Blender e) specifically along the y axis (+'y' key, otherwise it may extrudes along a normal to face), and pulled to match sketch. Following this, mirrored points are manipulated in much the same way as before to shape the stern section |
|
| The fantail required some additional clean up as the faces were severely distorted and curved. I deleted some edges and reconnected some lines creating a new set of faces that follow the contour of the hull better.
The center frames needed to blend the stern with the bow, and it simply required matching the coordinates along the co-linear y axis points at the edges of the hull. This was done by selecting the affected points and matching the x coordinates (z having been set when they cross-section was lifted to match the right height already). |

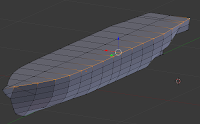
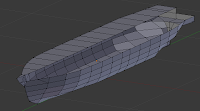
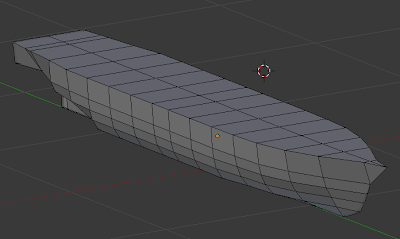
The end result is the more or less finished hull. Less so because many of these 4 sided faces are not flat, and as a result cannot be "flattened" into a shape transferable to a paper model or subsequent plastic card template, although it may be ok for 3d printing hardware. For cgi, well, there are just too few faces here, but trust me, you want to keep this number low for generating paper kits. Creating flat faces requires changing affected faces into triangles (quad to tri operation in Blender, ctrl+t). By definition, triangles are flat so they will not create a problem. I'm not going to detail that bit just yet since our main objective is creating bulkheads, but since this has been pretty time consuming, I'll leave that to a part II posting.
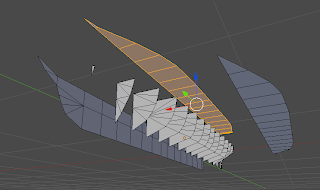
Coming next: Part 2, making bulkheads
