Odds and Ends from my brain and interests. Given that it is meant to be much like my old cartoon strip at the Lowell Connector, I suppose it is eponymous (I also like that it does make an oxymoron of sorts)

If there is to be anything here of any regularity it should be about sci-fi, computers, technology, and scale modeling with origami thrown in on the side (at least not infrequently). Oh, I would also expect some cartooning too

Monday, February 21, 2011

Mod Mon Eventually....How I worked with Blender

Recently I read a post on the sf paper modeler's group on Yahoo asking about making paper models using model unfolding software. Well, I recently started using Blender and it's paper model script to create some stuff and so I replied with the following:

...What I've been doing (and bear in mind I've only started a couple of months ago with blender) is the following:

    1st: I get 3 views of the subject if possible (top, left, front), and opposing 3 as well if necessary (bottom, right, rear)
    2nd: I insert them into blender's orthogonal non-persp views as backgrounds with a certain amount of transparency. I scale these bg images with respect to the 1 inch scale or starting reference solid.
    3rd: Add the solid that best fits the part to be modeled. I've realized that in many cases modeling the whole thing at once makes it harder to unfold a reasonable part*. I'll try to use the simplest starting point possible, so if it's basically a box, I start with a cube. A symmetrical hull is really just a distorted cylinder.
    4th: Edit the solid along world axis lines as opposed to freely over 3d space and matching the tape to the background view. This last bit is tricky for hulls as I don't have accurate hull section plans for SF subjects (or any subjects really) so to some extent what I've done for the curvier subject is simply start at the front and work my way back trying to maintain the continuity of the edges.
It's at this point that someone said, that sound's great...hope to see some stuff. Well, it can still take a while to put something together. Even though I'm still too much of a newbie with Blender to write a true tutorial, I thought even a general overview of the process I used for one model would be helpful. Blender is not an easy tool (all 3D modeling tools are somewhat tricky). What makes most 3D modeling software difficult is that one can only use 2 dimensional I/O (mouse and screen) to create 3 dimensional objects. Blender can also be particularly difficult as the developers have consciously moved away from a traditional "Windows" GUI style to one geared around views and functionalities based on context. Blender relies more on the keyboard and buttons rather than dialog boxes or tabbed properties. X11 users should have an easier time with it. The version in this blog posting is Blender 2.54 beta.
     I have been really interested in rounding out the early rocketry models from Neil's paper modeling site. Besides his "Bumper" kit, I repainted one as US V2#3 and another as #59. I also thought, having some US V2s, I should also have some Soviet V2s - namely an R1 (Scunner) and R2 (Sibling) missiles. These subjects are particularly interesting since, unlike the US, their V2 variants were operational and in production for military and research uses.
R1, R2, R3, and R5m missiles scaled comparison (P. Gorin in Chertok's Rockets and People:Vol 2, p. 149)
←The profile on the right is from page 149 of "Rockets and People" by Boris Chertok (vol 2) which is available from NASA's online document servers
     So item one, I need a 3 view. Well for this example let's concentrate on the R2 because quite frankly R1 is just a V2. Now a nice thing about rockets is that they are basically symmetrical radially so all I really needed was a side view. This was a tad tricky since it's not like the Russians made a lot of this information public, but I did find various images on the web.
buttons for background image setting in 3D view context So starting with a profile, I inserted it into Blender using the background image insertion feature (right side 3D view panel). The resulting image was then offset and centered to where it would be easy to work with. In this case centered on the R2. It was ok to make it visible in all orthogonal views even though the XY plane was wrong, but for this shape top and bottom views were irrelevant.
semi transparent background profile inserted
At this point I added a solid to sculpt the shape from. For any classical rocket shape, the cylinder is perhaps the best starting point (from the "Add" option on the "info" panel). The cylinder was moved (grab function - "g") and centered over the view (either ZX or ZY plane) and in this case the top of the cylinder was selected and pulled upwards (first selected top edge + selected edge loop + top face center vertex, then grabbed along z only: "g, z"). I then selected the central point on the top face and pulled it up along the z axis to create the nose tip (below right). I then selected the ring of vertical edges and subdivided them several times (below center left)


stretch cyl. 
and nose
section cyl.scale to fitDone
The individual edge rings were selected and moved up and down to match appropriate heights of the intended shapes; the prospective seams if you will. Then with the ring at the right height, the ring was scaled (plain scale so as to scale evenly along the ring plane) so that the diameter of the ring matched the profile (above center right). This process was repeated from top to bottom (above right).
seam mark/unmark buttons (3D view context)
3/4 view with seams markedThe last step is to mark the seams for the paper model plug-in. While the paper model plug-in will create the seams for you, it will follow your marks preferentially (at least the last time I checked the FAQs). In order to prevent some version of THE Flying Spaghetti Monster, I marked what I thought were the logical seams. Each ring from top to bottom and one vertical edge from tip to base. On the following image of the model you can see the marked edges as red (this is a slightly angled view from top to bottom). Now blender can attach a texture to the skin of your model, but I haven't mastered that yet so the reader will have to follow that up for themselves. Instead I'll go straight to exporting the model. This is done from the "file" option under the "info" context menu.
Exporting through paper model plugin

When you export a paper model, besides the project name (you may get several individual files using the  model name as a base prefix), you can define the printout scale and the size of tabs. I shy away from most tabs so I won't focus on this too much. The printout scale can be a problem. The script will not automatically scale to fit the largest part onto a sheet of paper. You do get some information about how big the part/page mismatch is so it is possible to quickly narrow down to a workable scale factor. The more important thing here is to pick a relatively high image density for your output. If you stick to anything below 100dpi you will see jaggies and if you want to work on the image afterward you will be limited. Instead go for something around 200dpi at least. As a rule of thumb, for those who want to size their images conservatively, dpi should be at least half what you want to print it at. I like printing at 300 on inkjets and 600 on laser so files of around 200 work pretty well for me. Once you finish the export you should get an svg file (scalable vector graphic) with the parts in their raw form (if you can texture them, you would basically have a finished model now).
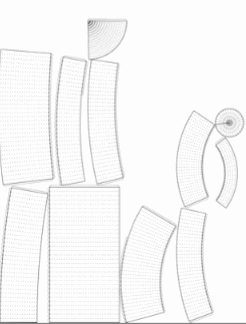
R2 parts thumbnail


Thumbnail of R2 parts as generated

     The script is nice in that it will automatically generate multiple pages if you need them, the limiting factor being only the size of the largest part itself. This points to the importance of marking seams. I could conceivably make this rocket shape with only one centipede like part. If I did that though I would have to make it rather small to fit onto a page. By purposely marking smaller sections, packing parts to a page should be easier and done to a larger scale. This is important as "jaggies" are less of an issue at the large scales on curves and diagonals.
     Now the script isn't perfect. Part placement is curious and in many ways not ideal. The packing algorithm tends to push parts to the edges so losing an 1/8 of an inch on a part corner is not unusual. It is also not unusual for parts to be cut haphazardly if you don't mark seams beforehand. This is part of the reason I like the idea of finishing off the parts separately. I have also noticed that fairly frequently the parts are very distorted. I don't know exactly why, but I suspect it has to do with shape complexity and non-coplanar surfaces. A 3 point plane is always co-planar, but a 4 point plane can hide a saddle surface so that this shape is not directly unfoldable without introducing some seams somewhere. This version of the script will warn of such faces, but in general I have found that the best trick is to keep your unfold objects simple and only have triangular faces around what will be problem areas.
    I'm currently positioning, painting, and fine-tuning the parts for this "Sibling" and I am planning a future post with finishing details on the R2.  In future I am also planning to post a similar Blender work through for something with a trickier shape (Cargo version of Aries 1b? hmmm).

Saturday, February 12, 2011

Sunday Comic: Life on Mars

©1996,2011
originally 9/24/96

Take a look at the spaceman
Chatting up some red stone
Oh man! Wonder if he'll ever know
He's in the best selling show
Is there life on Mars?

Monday, January 17, 2011

Arisia 2011 Modeling Workshop - Thanks

    Well, it's over and I would like to thank everybody who came to the workshop on paper spaceships. It's the very first time I have done anything like that and it was really great to get the opportunity to talk about modeling and paper modeling in particular.
     I hope that anybody that didn't have too much success at the workshop doesn't come away from it feeling bad. On the way to finishing the first model I was happy with, many crashed into the waste paper basket (but not as catastrophically as the N-1).  I can only hope it at least sparked your interest and you will follow some of my suggestions for more information on the handout or in the expanded version on my previous blog entry.
     I definitely would like to do this again next year  and it would be great if one of you would help me run it. I think I have learned a lot from this experience to better shape version 2 if I get the opportunity to do it again. In the meantime, I'll put some informative links right here.
     Oh, also before I forget, I would love it if the gentleman who brought the book on the paper satellites comment with the actual title and author since I stupidly forgot to make a note of it. I remember that book from when I was in 7th grade and recall it was a really great beginner's book.

Some Workshop Links:

Hope this helps, and hope you have fun. See you next year!

Monday, January 10, 2011

Mod Monday: Arisia 2011 Workshop - Paper Starships (Part II)

(To go to Part 1 where the topic was introduced)

What will I need to build these models?


  • A computer with a working printer, ideally color, and a network connection. Since you are reading this right now I presume this is a given. Also handy is a pdf viewer like Adobe Acrobat and photo imaging software like Photoshop or Gimp to view and print files.
  • Materials to cut paper and cardstock: Scissors (a pair, one for large sections and one for details), a hobby blade is also handy such as an X-acto or similar, and a cutting surface (SAVE THAT TABLE TOP).
  • Glue: Something with low water content, sticky but not instantaneous. Preferably, you want the glue to be clear and non-staining. White glue will do if used carefully.
  • Straight edge and a sharp point: Kits go together better with straight cuts and scoring. A metal edged one can be used in combination with a sharp blade for long straight cuts and "rolling" (see below).
  • Paper and card stock: For most things, standard cardstock is about right. Photofinish paper is a good middle weight and has the benefit of having a naturally tacky surface and the ability to provide a glossy finish although it is pricier per sheet. There are times that regular paper will be better or just fine if layered (glueing parts on other sheets to double up). There are also times old cereal boxes are best. In this last case you can print the sheet on regular paper and then glue it onto thick, non-printable, cardboard.
  • Nice to have: tweezers for those small bits, round cylinders of different diameters and other curved surfaces for shaping curves, markers for touch ups. Also a vacuum cleaner for the little bits of paper litter you will generate.

Any general instructions?

  • Generally, cut close to the lines. Most of the glues you will use are water based so be careful as they can do 2 nasty things: 1) Warp your paper or card if over saturated, & 2) Cause inks from inkjet printers to run.
  • Paper has considerable strength by weight so it resists bending. It is better to score fold lines by running a sharp tip over the line prior to bending. If using a knife, be careful to not cut through the paper or score so deeply that the paper will tear when folded.
  • Paper can be curved without rolling by running a sharp edge against the inside such as the straight edge or the edge of a scissor. This is the same as curling ribbon. Be careful not to tear or crease your part accidentally in the process. This can happen with skinnier parts.
  • You can help finish a kit by using a marker or colored pencil to help blend in edges between parts. This is particularly noticeable in darker parts where the white of the card edge is shown in sharp relief. Some modelers exclusively use black felt to color in edges.
    Seams are perhaps the most problematic aspect of paper models as they are difficult to hide. Unlike plastic, you can rarely sand, fill, or paint over the problem. Most designs try to hide the seams in the pattern of the skin or put seams along natural join lines of the model.
    Another way to hide seams is to avoid "tabbed" construction and instead rely on "butt" joins where the glue tab lies underneath both glued pieces so that the edges of two pieces lie against both. This won't solve the edge visibility problem though on corner joins.
  • Other handy tips are available at the following sites:
    • Niel’s paper models tips page
    • Steve Brown’s very extensive FAQ.
    • The very detailed “build” descriptions of the Krakus and the coastal freighter Emiliana Torrine with lots of advanced tips and tricks by Mike Edwards, which while about earth bound ships is very useful nonetheless.

Last but not least, BE VERY CAREFUL WITH SHARP BLADES!

Can I make my own?

Yes, but you will need more of those special skills dismissed earlier. Some basic shapes can be tackled with some trigonometry and good scale 3 view drawings of the subject on graph paper. It also comes more easily if you are the type that could easily do those SAT folding shape problems. More complicated subjects require more math and are more easily tackled with specialized software.
    If you know how to use 3D modeling software such as Blender or Metasequoia there is Pepakura Designer (Tama Software). Pepakura Designer unfolds 3D models generated by 3D modeling software such as Metasequoia. It will generate tabbed parts to build the physical model. The generated file format requires their free viewer (.pdo). Unfortunately it only works on Microsoft platforms. Blender, a freeware 3D modeling software package, also has an unfolding tool which can be installed as a plug-in. Google SketchUp is also being used as unfolding plug-ins are also being written for it (see ss42.com's Miscellaneous page).
    You will also need a relatively capable image editor and drawing tool such as Adobe Photoshop or Gimp for either painting the “skin” or customizing downloaded models. In fact, repainting by itself is also a popular aspect of the hobby since it creates an easy way for groups of modelers to add to the fleet. Angel Guzman (PixelOz) provides a free e-book Fundamentals of Paper Model Design available at deviantart.com. I personally have found even a scanner useful for scanning in parts I manually fitted to a surface.

Where can I find more information?

There isn’t enough space to provide all the possibilities, but start by using the links pages from many of the sites you will find from the initial set of links here. You can also get help from many discussion groups out there such as Papermodels at  Google groups or the Space-Paper-Models and SciFpapermodels groups at yahoo.groups. There is also a card modeling group at the zealot.com hobby forum. The starshipmodeler.net discussion forum also maintains a card modeling section, but the whole forum, as well as its associated web site (starshipmodeler.com), is an excellent resource for sci-fi and real space subjects. As mentioned earlier, searching for paper or card models will yield many sites and files. As for discussion groups, many will require membership to download files or even to see or participate in discussions (a no lurkers policy). Some of the groups will have only limited activity or are perhaps focused on topics that won't interest you such as HO scale buildings.

In conclusion all I can say is try it out. It really isn't that hard, and they are easier to hang up on your ceiling (unless you build that 3 foot Serenity model that is out there somewhere).

(Part I)

Mod Monday: Arisia 2011 Workshop - Paper Starships

Arisia 2011 – Scale Paper Modeling Workshop - Saturday, Jan 15 at 5:00PM

Part 1: Where Mr. Zubie introduces the topic and gives some additional information
followed by Part 2: Where he gives some more practical information like instructions
The 2 page handout (abridged from here) is available from my Google Docs storage


Regarding small scale Sci-Fi Modeling and the merits of paper

The craft of creating realistic scaled versions of thoroughly unreal things can be
clockwise top G.Pilsworth's Orion, M. Urban's Mercury-Redstone, uhu02's Proteus, R. Caudillo's ENT-TOS bridge, U-Don's LM
practiced without requiring any particularly great skill in sculpture, sewing, makeup, portraiture, engineering, or biology. I mention this perhaps as a result of an inferiority complex when looking at all the costumes and artwork and the technical level of the hard sf panels. Still, while recreating some fantastic miniatures of sf, real science, or fantasy subjects does require some of the skills mentioned, I stand by the notion that they are not absolutely necessary if you want one.

(Pictured at left are paper models clockwise top Gary Pilsworth's Orion, Michael Urban's Mercury-Redstone, uhu02's Proteus from Fantastic Voyage, Ralph Currell's Space Ship One, Ron Caudillo's ENT-TOS bridge, U-Don's Lunar Module)

    If all you want is a fantastic miniature of something like Harper Goff's Nautilus for the Disney production of 20,000 Leagues Under the Sea, what you need is a generous pocketbook. The kind of prices collected from the Star Trek prop auctions as well as custom made studio scale models also illustrate the point. There are also commercially available plastic kits, for which some art skills are handy. Even though these kits are meant for the general consumer, plastic kits can still be surprisingly pricey, particularly if you are affected by advanced modeler syndrome. Brass detailling sheets, customized decals, and accuratized resin parts (as well as entire resin kits) can easily turn a $20 or $30 kit (which is what many retail for as new, if not more) into a $100+ project. If you absolutely, positively want a release that you remember as only six dollars 20 or 30 years ago (or more) be prepared to pay collector's prices now.
    Paper or card modeling is by comparison a dirt-cheap method of indulging in the pastime of miniature recreations and generating some fairly impressive stuff. Why so? Well for starters, most of the models I'm talking about are designed for printing on your own personal printers using your own paper (here you have to do your own calculations per sheet, but I believe at the time of writing it is between 15 to 20 cents per sheet for inkjet and less than a nickel for laser). Canon's web site even promotes it.When assembled you will have a fully painted and detailed miniature, and all you did was cut and glue. Moreover, if you mess it up, you can just reprint it and start over. If you want a squadron, just print more.
    Paper modeling has been around for a very long time, but for the most part was limited to paper dolls and stuff on the back of a cereal box. In other parts of the world, however, it has proved more popular. The Internet and home publishing and photo editing software have made created a wave of available models. The level of difficulty and detail can vary quite widely. Some projects are simple (such as the one I'm planning to use at Arisia) and are good beginner projects. Often the level of detail drawn on the skin can veil the actual simplicity of the model itself by giving the illusion of texture and "greeblies" to your subject much like it does on digital models seen in film and computer games (It's perhaps this last aspect of the hobby that ticks off traditional modelers the most). On the other hand, some of these models are quite elaborate with movable or poseable parts (this Tyderium shuttle is a good example)

Where can I get these models?

They are available all over the Internet and many are free. Perhaps the best starting point is SpaceStation42.com’s links page. They maintain links on a variety of paper model websites with specific link pages for different subjects such as boats or cartoon characters. They have two specific pages for sci-fi and real-space models. As mentioned in a previous blog entry, this site is worth exploring backwards in time by using the wayback machine at the web archive. Of course there are other link sites and sites of interest. Some kits are available at discussion group sites such as Space-Paper-Models group at Yahoo! Groups through their archived documents or files. There are also many papercraft blogs such as PapercraftParadise, Paperkraft.net at that keep track of new stuff that shows up or are used by authors to post their work.
You can also search for them using the terms paper model or card model or even papercraft in English, although the last term will get you scrap bookers and origami as well. There are also foreign terms such as recortables in Spanish, karton modelbau in German, maquettes en carton/papier in French, or pepakura in Japanese. Pepakura is also the name of software that helps design these kits so many post these as pepakura formatted files (.pdo) which is currently only windows compatible.
    Commercially published kits, many from European publishers, can be purchased online from Amazon.com, or dedicated sellers such as Paper Models International (papermodels.net), or directly from authors such as Delta 7 studios. Some maybe available through your local bookshop, such as the recently published Clone Wars kits (ISBN 0448450046) or the Unseen University Cut Out Book (ISBN 0385609442).
    A final note that bears mentioning, particularly on downloaded models, is that of pirated kits. Since all you need to copy a printed kit is a scanner, and a digital kit only needs a drag and drop, there are many pirated kits out there. Production of kits is not easy and one should respect the wishes of commercial kitters to make a profit from their work. Also, many pirated models sold through sites like eBay are actually free to start with, so in a sense you are getting cheated in the process as well.

Now on to Part 2, where I shall go over what you need to build this stuff, and some general tips and pointers.

Sunday, December 19, 2010

Sunday Comic: Starry, Starry Night

©1996, 2010

Kind of fitting for the holiday season although the original commemorated my experience with the Great Comet of 1996, or Comet C/1996 B2 Hyakutake which I got to see that spring in the dark skies of southern New Hampshire. There's a color version below (originally meant for halftone printing so it was done in a very black and white format).


Monday, December 13, 2010

ModMon: Flying them around the room while making engine noises!

     I got my current schedule back from Arisia for next years con (about a month from now), and it appears that modeling as a topic is not in the works. I did get the paper modeling workshop scheduled and that's good. As a result, I've started to edit some kind of a handout for the workshop, mostly to provide links for tips, reference information, and of course, downloads. Still, I couldn't help but worry if anyone will show. I can only hope that the panel discussion didn't work out because there was insufficient panelist interest, i.e. talking heads, to do it. I hope there will be attendee interest anyway given what appears to be a high level of gadget and fashion interest among participants. Still, is it that dress up is ok, but little ships are not?
     As I was writing the handout's introduction I noted something universal. All of us as children at one time or another entered into other worlds through miniatures. It may have been a doll house (or action figure headquarters), or it may have been horses or a truck, or even a vaguely spaceship shaped razor case. These were probably the earliest stories we created on our own. Sure there were books, but at first these are read to you, and often full of pictures. In our miniature worlds, they were our stories and our landscapes. It's true that this wasn't our only imaginative game play. We had our costumed games and our role playing to be sure. Therefore,  grabbing our miniature representations of the world, say a metal die-cast P-47, flying it around the room while making engine noises and strafing the mad scientist's missile base was just part of our childhood repertoire. Inevitably, at some point, like reading quietly to yourself, you realize you shouldn't do it out loud anymore. Play has to be reasoned somehow as sport, or theater, or team building exercises. Imagination becomes more part of reading quietly to ourselves  and we put away childish things.
      Nothing terribly wrong with that I suppose. There were for me at least many worlds to go to in stories. There were strange planets, weird landscapes, bizarre situations and funny moments. There is also theater of the mind in radio and new scenes to be seen on television and movies.  Invariably though, you cannot "go" to these worlds anymore than you could actually sit inside the capsule you saw at the museum (or in a book of a museum). The miniature can then return as a way to somehow be there. I can't touch the real thing, because maybe it is long gone, too far away, too rare or because it was never real to begin with. Maybe it is a way to make real something you have always seen in your mind, but never realized like you saw it.
     Some can write the world they can see inside into some version of reality. Others will paint and sculpt it out or try to live it out in costume. There are also some like me that want the solidity of the miniature, so as to see the curves and corners, the colors and lines. With a model you can try to visualize the inhabitant's point of view, or picture the scale of the real thing (be it the real Saturn V stack or some television starship). You can even somehow re-enact some historical moment, or a story scene like the HMS Thunderchild facing down the Martian tripods. Needless to say it is also nice to be able to grab the thing, and when no one is looking, fly it around the room while making engine noises.

Sunday, December 12, 2010

Sunday Comic: Biohazard Bunny

Arisia 2011 created an open invitation for volunteer T-shirt design this year. While I was nicely complimented on my entry, it didn't make it. I have to admit it needed a more helpful caption than mine had. On the other hand I'll always wonder if things would have been different if I had captioned it ...

Biohazard Bunny to the rescue!


©2010
 Well, actually to the rescue of its fellow genetically enhanced lab rabbits regardless of collateral damage. After all, Biohazard Bunny has a heavily armed saucer and does travel.
Perhaps I'm venting some of my issues with our own house bunny (a veritable poop machine and arch enemy of USB cables, garbage bags, and geraniums).

Monday, December 06, 2010

Modeling Monday: Web pages that aren't quite dead yet

     This is something of a self serving post. Over time there have been many web sites that I've visited that had some cool reference photos or drawings that have come in handy for modeling hardware that have subsequently disappeared. This should be no surprise given the ephemeral nature of the web that was pretty self evident since I first discovered it. Fan sites were often being generated by students using their school web space and invariably all these sites would end shortly after graduation and the sys admin started clearing space on the disks. Research was also powered by those frequenting bulletin boards and alt.binaries.models.scale (and sometimes without the ".scale"). These of course were cleared on a regular basis.
     So, you saved a lot of stuff. Of course at the time before memory was cheap, you would bookmark stuff and dump it on floppies (boy, that's really dating me). Then systems crash, software changes, and stuff is eventually lost. Still, some places seemed to continue on and on, even if they weren't being updated. Then one day you take a peek and 404 comes up.  Over the years, many legacy free web space providers have merged, gone out of business, or simply phased out that part of the business and overnight the sites are gone. Thus the beauty of the Internet Archive (www.archive.org) which since about 1996 has been collecting pages off the web on a regular basis. So, if you have the URL of the page you want,  you can plug it into their "Wayback" machine and see if they actually got stuff. Alas, just because it existed doesn't mean they have it. Initially the collection focused on text content, images and other file formats later so sometimes you hit the site to see "close up of hatch" and see nothing. The other problem  may be the "robots.txt" file which directs web collection software to not cache the site. I recall this as being the problem of one excellent Space 1999 site whose author was upset about large scale downloading from his site. Another problem is that you have to know the URL because there is no keyword search on the archives data (not directly, although it is possible to Google it with a site restriction to the archive domain, but I suspect this is rather patchy and dependent on external links to that data).
     So the self serving part of the post is this: How do I keep track of references to archived URLs that show up on the web and discussions groups in addition to just saving it to myself? Well, why not post it. For instance:
  • Hangar 18 models used to have good reference shots of Space 1999 and The Black Hole until they stopped. (originally http://www.coldnorth.com/hangar-18-models/resources/)
  • Dannysoar's fantasy site and his home page for neat articles about some fantastical flying machines (and also weird free flyers). (originally centered around http://home.att.net/~dannysoar although you have to hunt around off the links a bit as he added accounts as he ran out of space)
  • The Modeler's Reference Vault which seems to have disappeared just this year (2010, formerly www.cloudster.com)
  • The Idic Page which had tons of Star Trek photos and stories (members.aol.com/idicpage/main.html).
  • The Lost Plan-It which was an early web page with reference shots to some of the rarer stuff like Dark Star, Valley Forge, and the Robinson Crusoe on Mars ship (www.execpc.com/~ppavlovi/lostplanit001.htm). The site is somewhat difficult to navigate and varied over time due to space restrictions
  • Precision Paper Models which was one of the first places I found cool card models (www76.pair.com/tjohnson/ppsm.html). Not everything was archived. Some versions of the Atlas booster are missing, but can be made up from other Atlas versions that are archived.
  • E. te Groen's models for the Philippus Lansbergen Observatory website are here. E. te Groen is still active and they may re-appear here or elsewhere.  (orig. www.lansbergen.net/eng/index.htm)
The other thing to try is just using the internet archive to go backwards in time with any of your old (or existing) links pages, such as www.spacestation42.com for card models or www.starshipmodeler.com, or even Yahoo.

The funny thing is this started fortuitously as a result of the ongoing search for those "easy" paper kits. There was a great beginner site called "Modular Space Toys" which consisted of a series of "module" models that could be combined with others to create a large variety of different models. Well, the site disappeared (it may come back), but for now the bulk of the module's are still available at http://web.archive.org/web/%2A/http://www.geocities.com/codex34/paper/paper1.html. These are great for downloading and re-painting as many of them are "gif" files and easy to edit on almost any picture editing software.

It isn't perfect. The archive is made up donated equipment run by volunteers. It often has retrieval problems and probably suffers from a non-trivial amount of memory loss, but hey, it's not dead yet!

p.s. If anyone knows if any cool archived site, or previous urls for the site (sometimes sites with a domain like "coolsf.com" may have had a previous existance as "www.geocities.com/user4/coolsf.htm") feel free to add the info below

Sunday, December 05, 2010

Sunday Comic: Moby DEC

©1995,2010


  Originally from December of '95. The result of a frazzled sketch on a whiteboard drawn sometime in the wee hours of working on final projects and a long series of failures to compile. The following morning complimented by my office mates, I took a picture and then redrew it for the school paper. I realized it was a very common sentiment.

Oh, I know it's not the literal quote, but I nonetheless made a point of crediting Ahab and not Khan.

Monday, November 29, 2010

Modeling Monday: Tor's Stubby

  In my ongoing search for fast easy paper models, I came across a paper model for Tor's retro rocket logo lovingly referred to as Stubby. The designer for this model is Robert Nava who has designed quite a few Disney inspired designs which are available at the Disney experience site.
  The model itself is simple enough, but not an hour build by any stretch. I did it over an afternoon. I wanted to do inside tabs for flush, butt joints, so I cut the shapes without the teeth and then glued the teeth tabs separately on the inside of the parts. I had originally printed this on cardstock (about 60lbs) and the tabs were still rather rigid. I then printed a copy on plain paper off the laser printer. I then glued plain paper tabs on the inside and this worked better. The extra copy also allowed me to use the extra fins as templates for cardstock fillers to stick inside the fins and thicken them up as well as provide a better sticking surface to the fuselage. I also used the extra tubes to line the inside of the rocket tubes and left off the "lit" ends. This allowed for a simple scrap wire stand that I just insert into the top tube.


  As often happens with paper models, the edges are always a problem. Even with some of the flush joining there was still quite a bit of white edge showing. I couldn't quite find the right color pencil to hide them (somewhere between a dark red and terracota). I might try this again reversing the print order, card on laser printer, color on thin paper, and just paper over the assembly with the color. This often works well at hiding seams.
  Well, I'm going to go back to working on my own stuff. I have a Robur's Albatros that I've been working on for a while as well as my Aries 1b which has been in test assembly for over a year.

  This last bit is annoying in that I finally got a version of the nose that I like, only to find some inaccuracies compared to new photos available at Douglas Trumbull's site. Still, I was only considering this a test build, so I'll just move onto the main hull. At least with the current photos I have a better sense of what's actually on it. For those of you who don't want to go crazy doing what I'm doing, there does exist a complete paper version of the Aries 1b by a very skilled and impressive Japanese designer (but I can't tell you who - you have to find it).
"To infinity and so on"(no tm)

Sunday, November 28, 2010

Sunday Comic: To those that survived...

I salute you!


             ,,            .           .
      |     /..\           |Los Pavos! |Armados!
     \||//  | \|                 .              
   _\\||/ __/ U/                 | Jamas seran Asados !
     \\\|/  \_ |\                                      
    |----\  |---------|-            
    |  __///---| 8----'          
    |-' ____   |_'
          \ /\ /             Happy Thanksgiving
           \| \|
            -- --


Well, due to technical difficulties I had to hunt stuff down. So deep down in the annals of my ASCII art I found my old holiday sig, which is in Castellano or otherwise Spanish. So for the Spanish speakers who are still working off the turkey triptophans from Thanksgiving here in the US of A, enjoy (particularly the children of the stormy 60's who would know the melody).

Monday, November 22, 2010

Modelin' Monday: My First Paper Trek

Well, its more or less ready for posting. As mentioned earlier, this was a project for a paper model that could be built in under an hour for an Arisia crafting workshop. I got some suggestions from the Starship Modeler Forum's paper section and caveats to limit myself to just simple geometric shapes. This is probably true, but at the same time I would like something more interesting than a simple geometric object like a pyramid or cube (although I do appreciate and plan to use the Borg cube, kindly offered by Marco Scheloske). There were these cool modular paper models that were somewhat simple, but on closer examination, may take a while for some of the more sophisticated iterations. I still hope to work them into the workshop (the website is long gone but survives at the web archive, although there is hope that it will return). I was also reminded of some of the simpler, beginner kits at the Lower Hudson Valley e-gift shop, as well as some gaming models.
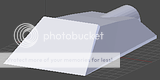
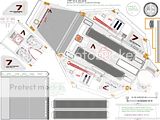
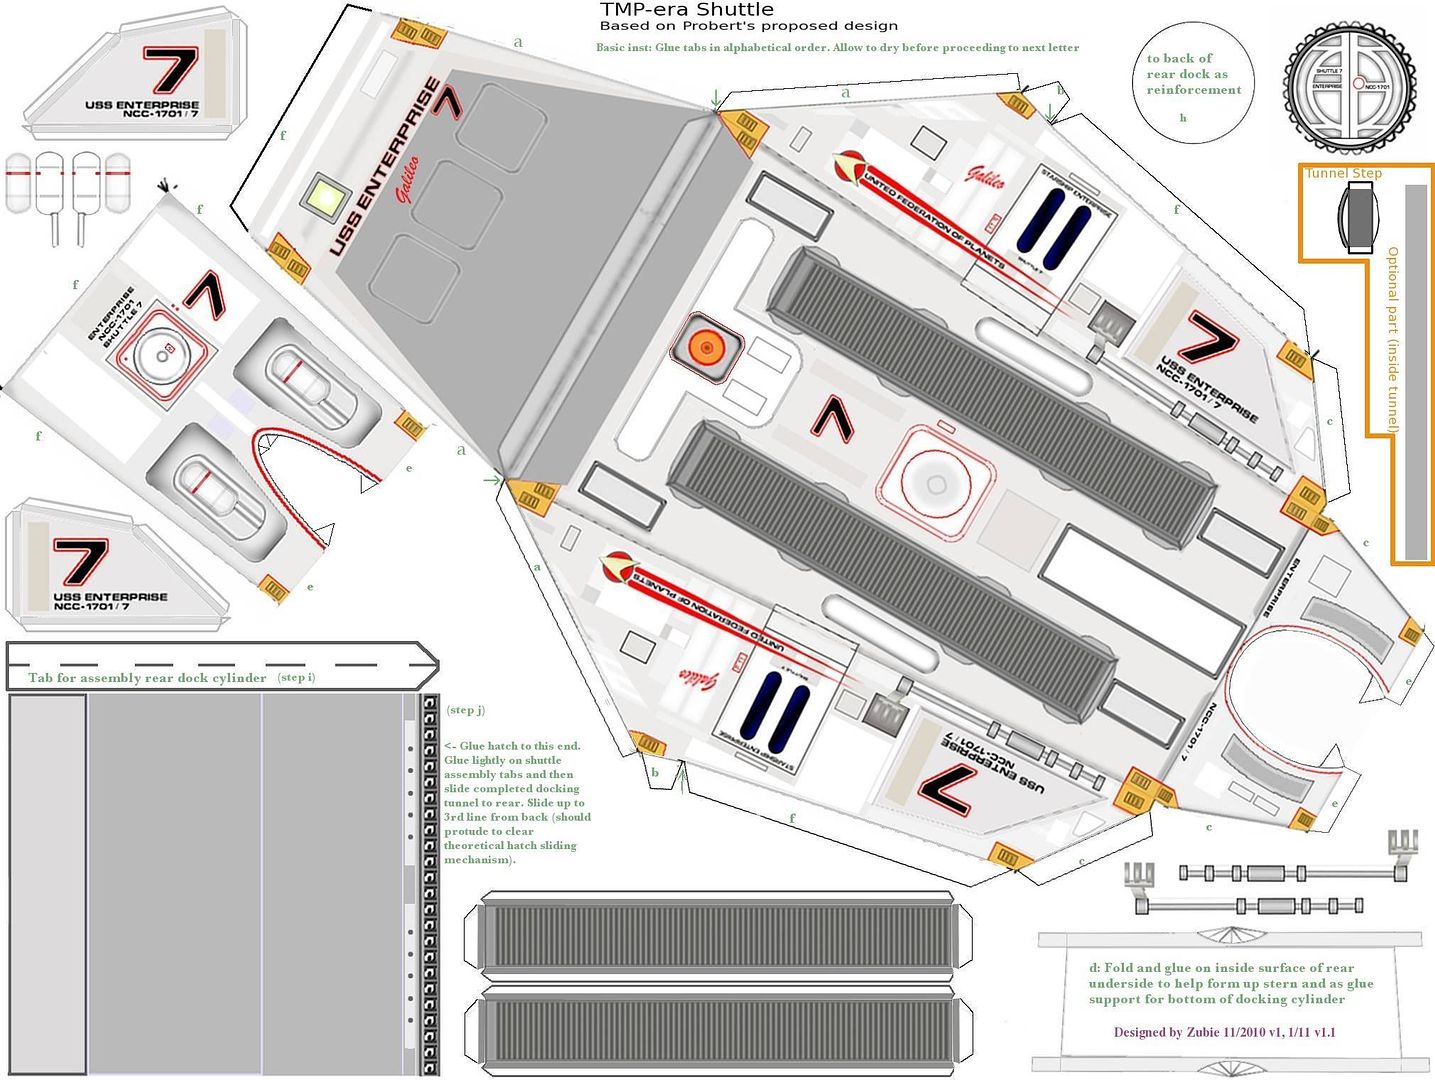
Returning to the main topic though, I created this simplified version of a Star Trek - The Motion Picture era shuttle (see previous entry) that is slightly more sophisticated than a box. It benefits from being simple, so instructions are not critical. The parts fit on one page, and there was room for a few more details. I'm currently working on a second page for anyone who wants to elaborate on the details a bit more. Hopefully soon I'll also have a slightly more curvy version that follows the lines of the ship implied by Probert more closely, albeit within reason for paper, meaning that it doesn't need to be folded 4 or 5 times just to round a corner.


This last image linked to jpg of model - PhotoBucket links have been removed
It's about 370Kb and for now located here. There really wasn't any room for instructions. As a result, you should probably use the following info. The tabs are listed alphabetically on the body in the order to be glued (letter on tab and near edge that it should match). Not mentioned specifically on the page is the scoring of the folds which makes assembly of the body way easier. On the nose, there is a valley fold that goes from the notch behind the "b" tabs (the green arrow) to the nose fold. Also valley fold the tab that connects the upper nose to the top back piece. All other tabs are mountain folds. Also, score for the mountain fold on the lower part of the rear bulkhead (from the notch in the tab straight across to the other notch). The dock doors are perhaps best glued to a thicker piece of card and cut just shallow of the teeth and then pushed through from the inside to the end of the tunnel tube. The thing can be slapped together in about an hour with some care, and some assembly pipelining such as building the docking tunnel while waiting for the fuselage to get more or less dry. The pictured model used standard card stock.
    Again, this is just a simple "slap in an hour" version with extra bits that can be glued on later such as the anti-grav doo-dads, EM propulsion thingies and GNDN tankage. Share and Enjoy.

Sunday, November 21, 2010

Wednesday, November 17, 2010

Wednesday's Child: The Dead IMacs

Dropping off my daughter at her music lesson, I noticed in the hall an old IMac, the hefty G3 candy drop variety. It was on, but I didn't check the specks for the OS or the hardware so I'm not sure of the age other than by color; a mix of white and ghost gray. It's not long for this world.

We had a couple of these. My wife had bought a steely gray IMac about 10 years ago (next generation after the lollipops came out), and the other a cute flower power mac hand-me down from her niece who upgraded. I liked these machines, but they always had some odd aggravating little quirks that made me really identify with the "crash different" video (If the link dies, just video search for "Mac Crash Different"). Sure, mode confusion on the control panel, erratic mouse behavior at times, useless error messages and interrupts (I think on a mac, "esc" is like the "close door" button on elevators). The apple software doesn't do what I want, and what I want wasn't ready for the OS. And speaking of apple, can't help but get a gnawing feeling that I'm getting the shaft by getting stuff that's not ready for prime time, paying a premium for it, then when the fix comes, they want you to pay for the stuff they should have gotten right in the first place. Ah...but the Unix terminal, at least I could work with the stuff the GUI keeps pretending doesn't exist.

Well, at any rate, I am not a "power" user and with time they did what they did well and quite frankly, it is comforting that it is hard to get a mac sick from the wrong piece of email or some criminal script. But, the machines were so self contained. I have resusitated pc's before and even keep an old P3 of similar performance recovered from the bits and pieces of others, and it wasn't hard to do. The Imac though would be another story.

Eventually the Imac started shutting down by itself. Research said that it was just a $9 battery, but to fix it required opening the whole thing and getting to the motherboard which on this boat anchor wasn't trivial...because SJ doesn't want you poking around in there. Eventually I get the guts to open it and after a bit of effort and dealing with the scary plastic cracking sound required to take the bottom off, I replace the battery. Voila! It works. Then the other mac dies and so I repeat the feat which also works. Alas this works for a little bit and then it starts doing it all over again.

Finally I read up on the problem again and basically it means you should kiss our mac goodbye because the real fault is a $100+ "flyback" transformer used to power the IMacs built in screen. You see Steve Jobs hates fans, they whine and whir and are, I guess, annoying, so the old Macs don't have them. Instead the heat up like a coffee pot and unfortunately over time fry this flyback transformer. Now, on a PC, if your screen burns out, you just replace the monitor, but here it's integral and you can't just replace it with any power supply because they are matched by board revision (not even by mac color). If you thought replacing the battery was tricky, doing anything to the board itself is a whole other level of effort. A substitute monitor requires finding an analog monitor with matching old style cable that you can patch into the video feed from the motherboard. Consider replacing the built in, well opening the other bits of the mac come with that "high voltages can result in injury AND death" warning that tends to turn one off and just throw in the towel.

Oh, great fortune that "Small Dog Electronics" would take the boat anchors off my hand for free. Of course I first wanted to see if there was anything I could take off them that I could use somewhere else, but unlike PC's there really wasn't. I took their memory, the hard drives, the DVD drives which being slot driven I probably can't use anywhere else and those fine speakers. That's it. They worked just fine for what I wanted them for and they died because I couldn't swap a monitor.

So that's today's "Wednesday's Child" even though I couldn't finish typing all this by the end of Wednesday. Fortunately it appears blogger thinks I live in California (How in the hell do I change that...there's always next Wed.). Oh, and by the way, I wrote this using a Mac.

Monday, November 15, 2010

Modeling Monday: Andrew Probert's Old New Shuttle

When Star Trek the Motion Picture was released, Andrew Probert was kept on to redesign the exteriors of the vehicles and environs for the movie "Enterprise" based on the initial designs for the abortive "Phase II" TV project. Of course, all Trek heads pretty much know this already. One of the distinctive ships in the movie was the Vulcan Shuttle that Spock travels on to intercept the Enterprise on its emergency mission. At the time, Probert stated that he also wanted to use this shuttle module design as the basis for a new shuttle design for the Enterprise, albeit in a somewhat more compact form. He included this design in his proposed matte views of the hangar deck and are included in "Mr. Scott's Guide to the Enterprise" which still sits in my bookcase (The book also has a profile of this shuttle). In the end, the producers left the shuttle bay empty in the final matte painting and so this design is not considered canon, in fact considering the dearth of other references, it practically doesn't exist at all (There's a reference to it as an "SW7 class" shuttle, why...beats me).
Enter Arisia 2011, where I've been accepted to talk about sci-fi modeling and run a paper modeling workshop and the problem is how to make a model in 50 minutes. After setting up the proposal on the forum at starship modeler, I get some caveats about glue drying and folding and that it may be hard. Then I remember the Probert ST-TMP shuttle and think - it's really just a box right. So now I've embarked on kitting the shuttle. It's been an interesting process being the first time I've used modeling software (Blender) to do this as opposed to just trigonometry.
The end result has been a shuttle on one page that builds in under an hour. Now just to finalize the details. Maybe somebody can use it to recreate the scene in Andrew Probert's painting.
(Needless to say since this post the model was indeed finished - it's the next post Modelin' Monday: My First Paper Trek)

Sunday, November 14, 2010

Sunday Comic

This was originally meant as a "rally sign" submission for John Stewart's "Rally to Restore Sanity"("and or fear") "Sane or Not"contest. Alas, every machine with any kind of art software went on the fritz around that time, and by the time I got Gimp downloaded and installed (and back into its particular idiosyncrasies), well the submission deadline had passed. So, now for your enjoyment...consider this thought to inject a little sanity into your life.

©2010

Thursday, November 04, 2010

Well, what do you know....

It's still here. Originally I started this just to practice what it was like to use a blogging service (as opposed to just writing something within available web space...typically at a college server. Well it has changed quite a bit as far as available features since then, but in many ways still limiting the way geocities used to — mainly sticking to existing templates if you want your life to be simple.

On the other hand, I was just able to stick in an "—" without any real trouble, but I still had to stick in the paragraph break myself. Needless to say the CSS control is nice (even if the resulting style sheet is really hard to decipher). Well for now I'll just leave it and live with it.

Sunday, January 15, 2006

And so it begins...

Testing...1, 2, 3

Practicing for the course...

More later